I'm a big fan of keeping things organized. Or a crazy person. Anyway, here are some shots of how I've chosen to keep things in my shop organized.
Machinist square tray
I got some machinist squares recently, and used some old HDPE to make a tray for them. If I had my 3D printer up and running, it would have been easier to print something to hold them all. I may yet do that.
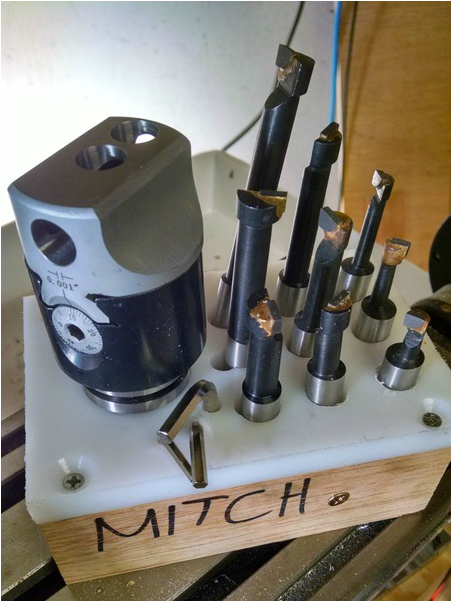
Boring head kit
I got a neat 2" boring head, some boring bars, and a Tormach TTS adaptor from littlemachineshop.com. The TTS adaptor is much easier to install into my mill. Using a boring head can be a pain in the butt though, since there are all these different boring bars to keep track of, and these tiny hex keys for adjusting everything. It's much simpler to build a caddy to hold everything you need for boring. There are 9 pockets for the nine boring bars (all with a 5/8" hole to match their 1/2" shank), three holes for the three different hex keys, and a .800 hole for the 3/4" shank of the TTS arbor on the boring head itself.
(Not shown is where I engraved the boring head "RADIAL" so I don't confuse myself and think that the adjustment is diametrical.)
(Not shown is where I engraved the boring head "RADIAL" so I don't confuse myself and think that the adjustment is diametrical.)
SHadowed toolbox
All of my organization started with shadowing my toolbox. Shadowing is really nice, because you can tell if anything's missing, and you know where everything goes. I didn't want to order real toolbox foam online, so I bought garage floor foam instead. It works reasonably well, and you can write on it with Sharpie, but it puts up a hell of a fight when you actually cut out shapes. (As an aside, it wouldn't be accurate to say that I've 5S-ed my toolbox here, as one S is "Standardize", and I haven't standardized two toolboxes to be exactly the same. I don't even have two toolboxes!)

You can see there's a screwdriver missing from the upper drawer.